>>
30-MINUTE MEALS! Get the email series now →


Soft, tender red velvet cookies with a tangy cream cheese center — a festive twist on the classic thumbprint cookie that's perfect for holidays and gatherings.

This batch of red velvet thumbprint cookies has been a holiday staple at my kitchen table for years. I first developed the combination of cocoa-scented red dough and a silky cream cheese filling during a quiet December afternoon when I wanted something that felt festive but was still straightforward to make. The dough yields cookies that are tender at the center with slightly firm edges, and the cream cheese filling adds a bright, tangy contrast that keeps each bite balanced and satisfying. Every time I bring these to a gathering on Feed Cooks, they disappear fast — friends love the color and the familiar cream cheese flavor that makes each cookie feel indulgent yet homey.
What makes these especially memorable is their texture. The small amount of cocoa keeps the flavor subtle while the long-creaming of butter and sugar creates an aerated dough that bakes into a delicate crumb. I often recall my neighbor’s reaction the first time she tasted them: she said they reminded her of a mini red velvet cake in cookie form. Because the recipe is forgiving, it became my go-to when I need a crowd-pleasing dessert that also travels well. Whether you make them for a cookie swap, a weeknight treat, or a festive party, these will become one of your reliable favorites.
My family’s response is always the best endorsement: my son asked for these instead of cake at his last birthday. I discovered small tweaks over multiple batches—using slightly softened cream cheese yields a silkier filling, and chilling the dough briefly makes cleaner thumbprints. These are reliably good whether you’re baking for a crowd or just a cozy evening at home.

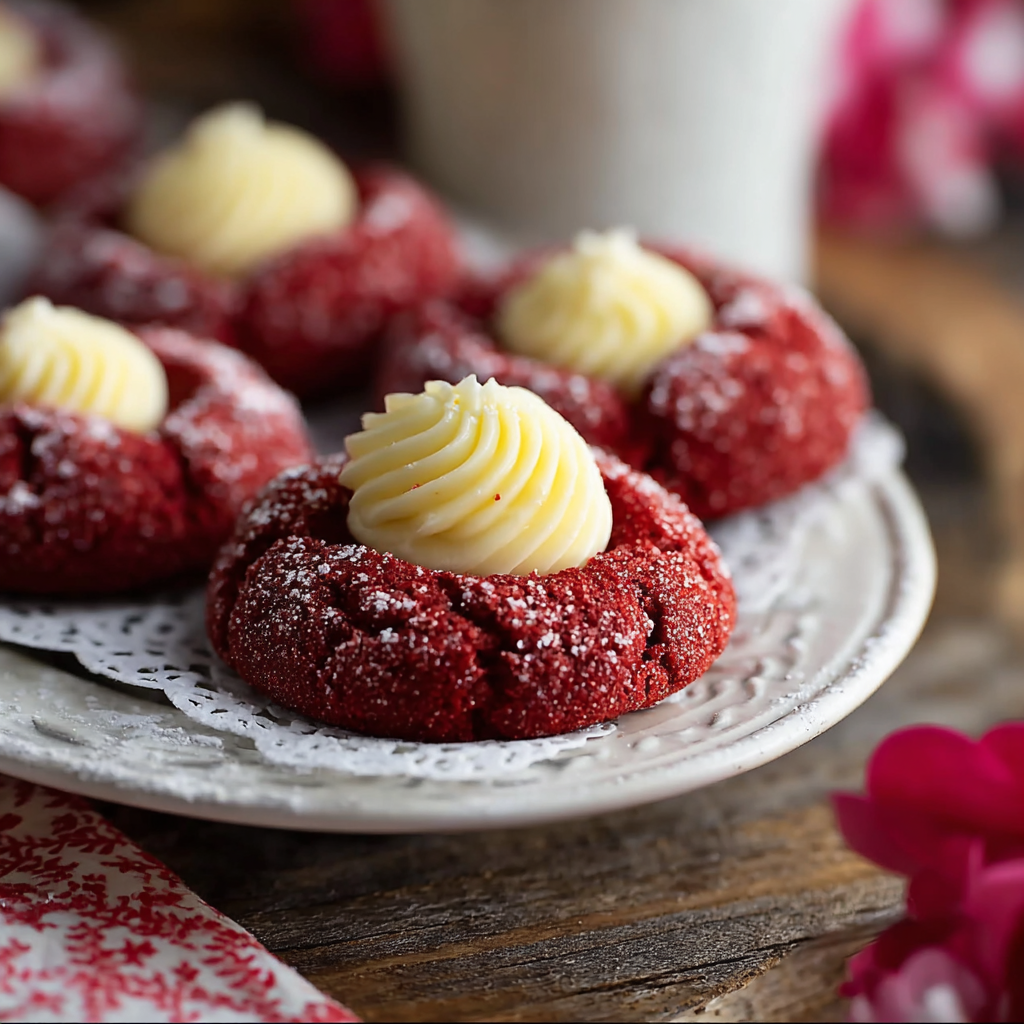
My favorite part is watching the contrast between the vivid red cookie and the glossy cream cheese center as they cool. When friends ask for the recipe, I always tell them the little tips that make the difference: chill briefly if the dough is sticky, and fill the thumbprints while the cookies are warm but not hot for the best presentation.
Store cooled cookies in an airtight container layered with parchment paper at room temperature for up to two days; beyond that refrigerate to preserve the cream cheese filling for up to five days. To freeze, place baked cookies in a single layer on a sheet, flash-freeze for 30 minutes, then transfer to a resealable bag for up to three months. Reheat frozen cookies at 300°F (150°C) for 5 to 7 minutes to refresh the texture, or thaw at room temperature for 30 minutes before serving.
If you need dairy-free options, use a plant-based butter substitute and a vegan cream cheese alternative — keep in mind texture and flavor will vary slightly. For gluten-free cookies, replace the all-purpose flour with a 1-to-1 gluten-free flour blend and add 1/4 teaspoon xanthan gum if the blend doesn’t already contain it. If you prefer less sweet filling, reduce powdered sugar by 2 tablespoons and taste as you combine.
Serve these as a centerpiece on a cookie plate, garnished with a light dusting of powdered sugar or a few festive sprinkles. Pair with a cup of strong coffee, a milky hot chocolate, or tea. For parties, arrange them around a platter of contrasting cookies — shortbread or lemon bars complement their richness. They also work well packaged in small boxes for gifts.
Thumbprint cookies have European origins and were traditionally filled with jam. The red velvet flavor emerged in American baking traditions, popularized by a combination of cocoa and buttermilk in layered cakes. Combining the thumbprint form with cream cheese filling is a modern twist that borrows from classic American red velvet desserts, blending nostalgia with contemporary presentation.
For winter holidays, add a pinch of cinnamon to the dough or top the filling with crushed peppermint. In spring, substitute a lemon-cream cheese filling for a brighter flavor. For Valentine’s Day, use heart-shaped sprinkles or pipe a tiny rosette of filling. These small seasonal swaps change the mood without altering the simple technique that makes this recipe so reliable.
Make the dough a day ahead and keep it refrigerated in an airtight container; bring it to a slightly chilled but pliable state before rolling. Alternatively, form and freeze the dough balls on a tray, then transfer to a bag; bake from frozen adding 1–2 minutes to the baking time. Prepare the filling the morning of your event and pipe it in just before baking, or fill warm cookies shortly after they come out of the oven for the best sheen.
These red velvet thumbprint cookies are a joyful combination of texture, color, and flavor — easy to make and even easier to love. Try a batch and make the small adjustments you prefer; soon they’ll be a shared favorite in your home too.
Use gel food coloring for the brightest red with minimal added liquid.
Chill the dough briefly if it feels too soft before shaping to prevent spreading.
Sift powdered sugar before mixing it into the cream cheese to avoid lumps.
If the thumbprint closes during baking, make a slightly deeper indentation before adding filling.
This nourishing red velvet thumbprint cookies with cream cheese recipe is sure to be a staple in your kitchen. Enjoy every moist, high protein slice — it is perfect for breakfast or as a wholesome snack any time.
Yes. Baked cookies freeze well for up to 3 months if flash-frozen and stored in an airtight bag; thaw at room temperature.
Chill the dough for 10 to 20 minutes so it firms up, which makes rolling and thumbprinting easier and cleaner.
This Red Velvet Thumbprint Cookies with Cream Cheese recipe makes perfectly juicy, tender, and flavorful steak every time! Serve with potatoes and a side salad for an unforgettable dinner in under 30 minutes.
Preheat the oven to 350°F (175°C) and line a baking sheet with parchment paper. Use a light-colored heavy baking sheet for even baking.
Cream softened butter and granulated sugar until pale and fluffy, about 2 to 3 minutes. Scrape down the bowl to ensure even mixing.
Beat in the room-temperature egg and vanilla extract until smooth and glossy to help bind the dough.
Mix in the cocoa powder and red food coloring until uniformly colored. Use gel coloring for deeper hue with less liquid.
Whisk flour, baking powder, and salt, then add gradually to the wet ingredients until just combined to maintain tenderness.
Roll dough into 1-inch balls, place on prepared sheet, and use your thumb to make a shallow indentation in each ball.
Beat softened cream cheese with sifted powdered sugar until smooth. Spoon about 1/2 teaspoon into each indentation.
Bake for 12 to 15 minutes until edges are set. Cool on the baking sheet 5 minutes before transferring to a wire rack to cool completely.
Last Step: Please leave a rating and comment letting us know how you liked this recipe! This helps our business to thrive and continue providing free, high-quality recipes for you.
Leave a comment & rating below or tag
@feedcooks on social media!

Turn classic crispy treats into creepily realistic Halloween brains—soft, glossy marshmallow centers bound to Rice Krispies, shaped and painted for maximum spooky impact.

A cozy, slow-cooked blend of tender chicken, crushed tomatoes, cream, and Parmesan—this Crock Pot creamy chicken parmesan soup is weeknight comfort made effortless.

Delicate baked cod fillets finished in a bright, silky coconut-lemon cream—an easy weeknight centerpiece that feels special enough for guests.
Leave a comment & rating below or tag @feedcooks on social media!
Enjoyed this recipe? Share it with friends and family, and don't forget to leave a review!
This recipe looks amazing! Can't wait to try it.
Comments are stored locally in your browser. Server comments are displayed alongside your local comments.

Join to receive our email series which contains a round-up of some of our quick and easy family favorite recipes.
