
Crispy Chilli Beef

Thinly sliced beef coated in a light, crisp batter and tossed in a sticky, spicy-sweet chilli sauce — a fast, crowd-pleasing main that’s perfect for weeknights.
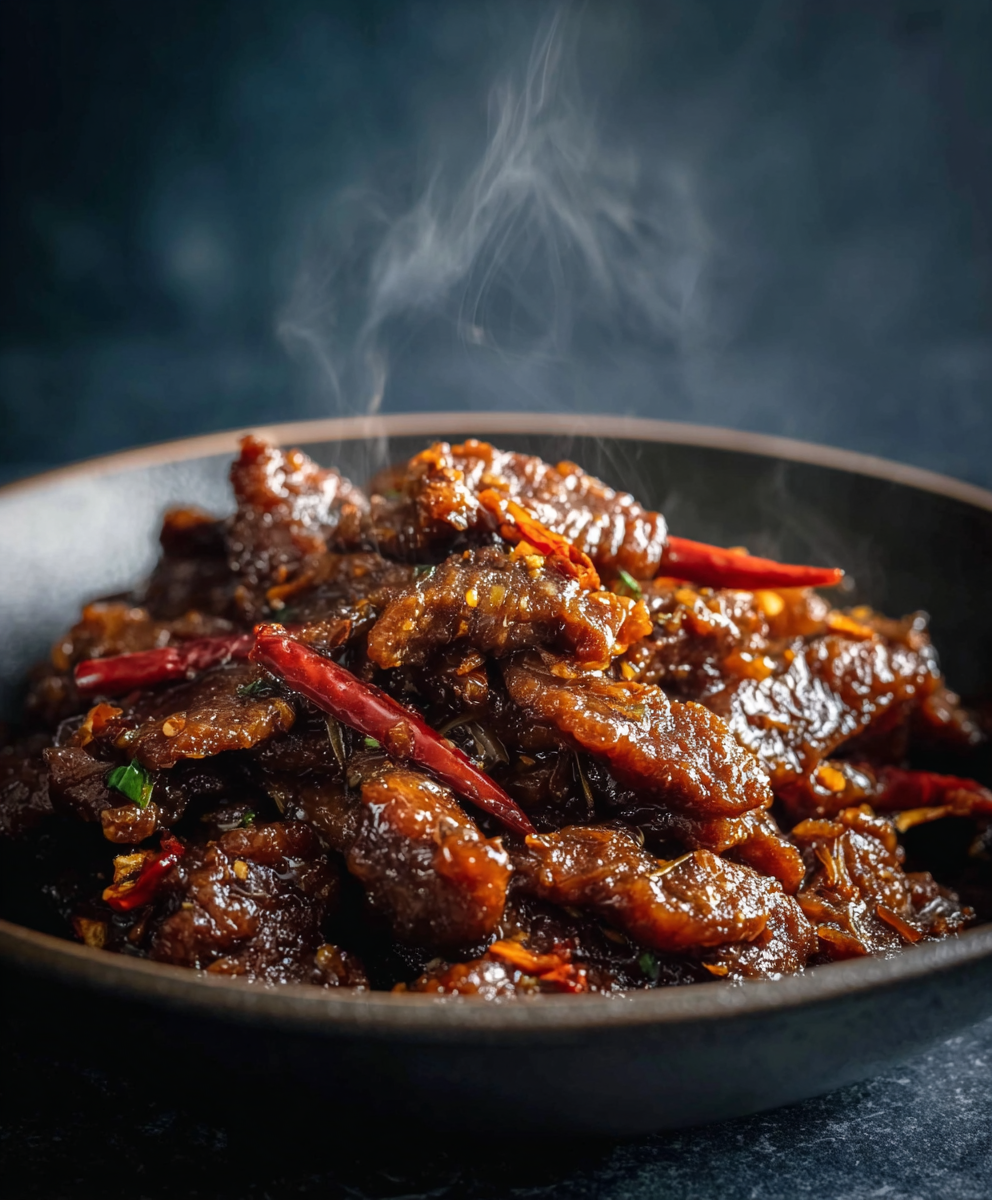
This Crispy Chilli Beef is one of those quick weeknight heroes that tastes like it took far longer to make than it actually does. I first developed this version on a rainy Friday when takeout felt inevitable; using a simple batter and a punchy chilli-hoisin sauce transformed ordinary sirloin into a crunchy, saucy dish that had everyone at the table asking for seconds. The contrast between the crisp, golden exterior and the glossy, slightly sticky sauce is what makes it memorable — you get that satisfying crunch followed by a warm, umami-rich finish.
I love this preparation because it’s flexible: you can dial the heat up or down with the chilli sauce and fresh red chilies, and you can switch the cut of meat depending on what’s on sale. Texture is everything here — slice the beef thin and across the grain to keep bites tender, and remove excess batter before frying to avoid a gummy finish. The method has become my go-to for casual dinners, game nights, and when friends pop over unexpectedly; it’s fast, impressive, and pairs beautifully with a bowl of steamed rice or a quick cucumber salad.
Why You'll Love This Recipe
- Ready in about 30 minutes from start to finish — perfect for busy weeknights when you want something special without the fuss.
- Uses pantry staples like cornstarch, all-purpose flour, soy sauce, and hoisin — no exotic shopping required.
- Textural contrast: a light, crunchy coating with a glossy, savory-sweet chilli sauce that clings to each piece.
- Flexible heat level — adjust the 1 tablespoon chilli sauce and optional fresh red chilies to suit your family’s tolerance.
- Make-ahead friendly: you can prepare the sauce and slice the beef up to 12 hours ahead for faster cook time.
- Crowd-pleasing and shareable — great for plating family-style or serving over rice for a hearty meal.
I tested this several times with different cuts and thicknesses and the consensus in my kitchen was unanimous: thin, evenly sliced sirloin or flank gives the best balance of tenderness and flavor. On cold evenings it warmed up the whole house, and at summer gatherings it became the star with guests raving about the crisp bites and bright sauce.
Ingredients
- 1 lb beef sirloin or flank steak, thinly sliced: Look for well-marbled sirloin or a thin flank steak. Trim large silver skin but keep a bit of fat for flavor. Slice against the grain about 1/8 to 1/4 inch thick for tenderness.
- 1/4 cup cornstarch: Provides the primary crisping agent. Cornstarch fries up glassy and light — I use it as the majority of the coating for maximum crunch.
- 1/4 cup all-purpose flour: Adds structure to the coating so it adheres easily while keeping the crust from being too dense.
- 1 egg + 1/4 cup water: Forms a loose batter to bind the dry mix to the beef without weighing it down.
- 1/2 teaspoon baking powder: Gives a touch of lift to the coating, creating a delicate, crackly texture when fried.
- Salt and pepper: Season the beef lightly before coating to keep the interior flavorful.
- Vegetable oil for frying: Use a neutral oil with a high smoke point, such as canola or peanut, and maintain 350–375°F for best results.
- For the sauce: 2 tablespoons soy sauce, 1 tablespoon rice vinegar, 2 tablespoons hoisin sauce, 1 tablespoon chilli sauce (adjust to taste), 2 teaspoons sugar, 1 tablespoon minced garlic, 1 tablespoon minced ginger, 1/2 onion sliced, 1 bell pepper sliced, 1–2 red chilies sliced (optional), 1 tablespoon sesame oil, 1 tablespoon chopped green onions for garnish — these combine for a sticky, balanced finish.
Instructions
Prepare the Beef: Start by slicing the steak across the grain into thin strips (about 1/8–1/4 inch). Pat the strips dry with paper towels to remove surface moisture — dry meat yields a crispier coating. Season lightly with salt and freshly ground black pepper. Toss the slices to distribute seasoning evenly. Make the Batter: In a shallow bowl whisk together 1/4 cup cornstarch, 1/4 cup all-purpose flour, and 1/2 teaspoon baking powder. In a separate bowl beat the egg with 1/4 cup water until smooth, then pour into the dry mix and stir briefly to a slightly lumpy batter. You want a batter that clings but isn’t thick like pancake batter. Coat the Strips: Working in small batches to avoid crowding, dip each slice in the batter, shaking off excess gently so you retain a thin coating. Let the buttered edge rest on a wire rack for 1–2 minutes to set slightly — this helps achieve an even crust when frying. Fry Until Golden: Heat vegetable oil in a deep skillet or wok to 350–375°F (175–190°C). Fry the beef in batches for 2–3 minutes per side or until golden and crisp. Avoid overcrowding to keep oil temperature steady. Transfer to a wire rack over a baking sheet to drain — this preserves the crispness better than paper towels. Prepare the Sauce and Vegetables: Wipe most of the oil from the wok, leaving 1 tablespoon. Sauté 1 tablespoon minced garlic and 1 tablespoon minced ginger over medium-high heat for 30 seconds until fragrant. Add sliced 1/2 onion and 1 sliced bell pepper and stir-fry 1–2 minutes until slightly softened but still crisp. Mix together 2 tablespoons soy sauce, 1 tablespoon rice vinegar, 2 tablespoons hoisin sauce, 1 tablespoon chilli sauce, and 2 teaspoons sugar, then pour into the pan and bring to a simmer. Toss and Finish: Return the fried beef to the pan and toss quickly to coat in the glossy sauce. Drizzle 1 tablespoon sesame oil, add sliced red chilies if using, and toss for 30–45 seconds to marry flavors. Garnish with 1 tablespoon chopped green onions and serve immediately over steamed rice.
You Must Know
- Keep oil temperature between 350–375°F for even browning; too cool and the coating soaks oil, too hot and the exterior burns before the inside cooks.
- Slicing across the grain shortens muscle fibers and ensures each bite is tender rather than chewy.
- Leftovers store well refrigerated for 2–3 days; re-crisp in a 400°F oven for 6–8 minutes rather than microwaving to preserve texture.
- This dish freezes okay (sauce and beef separately); freeze cooked beef without sauce for up to 3 months and reheat in a hot oven.
- Avoid over-saucing: add just enough sauce to coat — too much will make the crust soggy quickly.
My favorite part is the moment the sauce hits the hot beef and transforms the crispy coating into glossy, spicy-sweet bites — it always pulls guests into the kitchen. Family members have told me this tastes like a homemade version of their favorite takeout, and that’s exactly the goal: restaurant-style textures with ingredients you can buy at any grocery store.

Storage Tips
Store leftovers in an airtight container in the refrigerator for up to 3 days. For best texture, keep the fried beef separate from the sauce — reheat the beef on a wire rack in a 400°F oven for 6–8 minutes, then toss briefly with warmed sauce on the stove. If you must freeze, place cooked, cooled beef in a single layer on a tray to flash-freeze for 30 minutes, then transfer to a freezer bag for up to 3 months; thaw overnight in the refrigerator before reheating.
Ingredient Substitutions
If you need a gluten-free version, swap the all-purpose flour for rice flour and use tamari or coconut aminos in place of soy sauce (check hoisin — many brands contain wheat; choose a gluten-free hoisin or omit and increase hoisin-free sweeteners). For a lighter batter, replace 1/4 cup flour with an equal amount of rice flour. For poultry lovers, thinly sliced chicken breast or thigh works well when marinated briefly in a touch of soy and cornstarch.
Serving Suggestions
Serve this over steamed jasmine or short-grain rice to soak up the sauce, or with fried rice for a heartier plate. For lighter sides, pair with a cucumber salad dressed in rice vinegar and sesame oil or quick pickled red onion. Garnish with toasted sesame seeds and extra sliced green onion for color and crunch. It also makes a delicious filling for lettuce wraps or a shareable platter with steamed broccoli.

Cultural Background
This preparation draws on Chinese-American stir-fry techniques — a mix of quick frying for crunch followed by a glossy, balanced sauce made from soy, hoisin, and rice vinegar. Similar dishes appear in Cantonese and Sichuan tables, where contrasts of texture and flavors (sweet, salty, sour, spicy) are prized. The method of light battering and high-heat frying is commonly used in many regional Chinese recipes adapted abroad to suit local ingredients.
Seasonal Adaptations
In summer, swap bell pepper for charred shishito peppers and add fresh basil for a brightness that complements the chilli. In winter, use thinly sliced root vegetables (parsnip) in the stir for earthier notes and replace fresh chilies with a dried chilli paste for deeper heat. Around holidays, scale the sauce up and serve family-style on platters with steamed greens to feed a crowd.
Meal Prep Tips
For meal prep, slice the beef and whisk the batter the night before, storing each separately in the fridge. Make the sauce ahead and keep chilled; when ready to eat, fry the beef in batches and toss with warmed sauce. Pack components separately: rice, sauce, and beef in meal containers to preserve the crispness until reheating. This method keeps lunches tasting freshly made.
Enjoy this Crispy Chilli Beef as a quick, satisfying way to bring restaurant-level excitement to your table using simple ingredients and straightforward technique. It’s one of those dishes I make when I want to impress without the stress — give it a try, adjust the heat to your family’s taste, and make it your own.
Pro Tips
Slice the beef thin and always across the grain to keep bites tender rather than chewy.
Maintain oil temperature between 350–375°F; use a thermometer for consistency and better results.
Dry the beef thoroughly before battering — excess moisture prevents a crisp crust.
Fry in small batches to avoid a drop in oil temperature and ensure even browning.
Re-crisp leftovers in a hot oven (400°F) on a wire rack rather than microwaving to preserve texture.
This nourishing crispy chilli beef recipe is sure to be a staple in your kitchen. Enjoy every moist, high protein slice — it is perfect for breakfast or as a wholesome snack any time.
Tags
Crispy Chilli Beef
This Crispy Chilli Beef recipe makes perfectly juicy, tender, and flavorful steak every time! Serve with potatoes and a side salad for an unforgettable dinner in under 30 minutes.
Ingredients
Beef and Coating
Sauce
Instructions
Prepare the Beef
Slice the steak thinly across the grain (1/8–1/4 inch), pat dry, and season lightly with salt and pepper so the interior remains flavorful and tender.
Make the Batter
Whisk cornstarch, flour, and baking powder in a shallow bowl; combine the egg and water separately, then mix into the dry ingredients to form a slightly lumpy batter that will cling to the beef.
Coat the Strips
Dip beef strips into the batter in small batches, letting excess drip off before resting briefly on a wire rack to set the coating for 1–2 minutes.
Fry Until Golden
Heat oil to 350–375°F and fry the beef in batches for 2–3 minutes per side until golden and crisp; drain on a wire rack to maintain texture.
Prepare Sauce and Vegetables
Sauté garlic and ginger, add onion and bell pepper, then pour in a pre-mixed sauce of soy, rice vinegar, hoisin, chilli sauce, and sugar; simmer to thicken slightly.
Toss and Finish
Return fried beef to the pan, toss to coat in the glossy sauce, finish with sesame oil and sliced chilies if using, then garnish with green onions and serve immediately.
Last Step: Please leave a rating and comment letting us know how you liked this recipe! This helps our business to thrive and continue providing free, high-quality recipes for you.
Nutrition
Did You Make This?
Leave a comment & rating below or tag
@feedcooks on social media!
Categories:
You might also like...

Marshmallow Rice Krispies Halloween Brains
Turn classic crispy treats into creepily realistic Halloween brains—soft, glossy marshmallow centers bound to Rice Krispies, shaped and painted for maximum spooky impact.

Crock Pot Creamy Chicken Parmesan Soup
A cozy, slow-cooked blend of tender chicken, crushed tomatoes, cream, and Parmesan—this Crock Pot creamy chicken parmesan soup is weeknight comfort made effortless.

Baked Cod in Coconut Lemon Cream Sauce
Delicate baked cod fillets finished in a bright, silky coconut-lemon cream—an easy weeknight centerpiece that feels special enough for guests.
Did You Make This?
Leave a comment & rating below or tag @feedcooks on social media!
Rate This Recipe
Share This Recipe
Enjoyed this recipe? Share it with friends and family, and don't forget to leave a review!
Comments (1)
This recipe looks amazing! Can't wait to try it.
Comments are stored locally in your browser. Server comments are displayed alongside your local comments.

Hi, I'm Lena!
What's Popular

30-Minute Meals!
Join to receive our email series which contains a round-up of some of our quick and easy family favorite recipes.